
-
Western blot training
Part 4: fluorescent western blot
Welcome to our training series on western blot. We’ll guide you through western blot basics and essential protocols before moving on to optimization, troubleshooting, and more advanced techniques.In Part 4 of our series on western blot, we explain how to perform fluorescent western blotting. First, we cover the advantages of fluorescent western blot and share useful tips on how to make the switch from chemiluminescence to fluorescence. We then go through a detailed protocol for fluorescent western blot. Finally, we’ll show you how to solve your fluorescent western blot problems with some troubleshooting tips.
Part 4 overview4.1 Switching to fluorescent western blotting
4.2 Fluorescent western blot protocol
4.3 Video troubleshooting guide
4.1 Switching to fluorescent western blottingThe most common detection methods for western blot include chemiluminescent (ECL) and fluorescent detection. Each has advantages and disadvantages, which depend on your needs and equipment available in your lab.
In this video, you’ll learn about the difference between the ECL and fluorescent detection systems as well as their main advantages and disadvantages.
So, what do you need to keep in mind when making the switch from ECL to fluorescence? Below are a few useful tips on how to get the best possible results out of your next fluorescent western blot experiment.Choosing your antibodies
• For clear and bright bands, use antibodies that have been properly validated in western blot.
• When multiplexing, ensure that each primary antibody used is from a different species or isotype.
• Use secondary antibodies that are highly cross-adsorbed to minimize cross-species reactivity.
• Primary antibodies conjugated to the correct fluorescent dye can also be used. However, as with ECL western blot, expect a weaker signal than when using a secondary antibody for detection.Optimizing your antibodies
Optimize the primary and secondary antibody concentrations to get the best signal-to-noise ratio:
• Find the optimal antibody concentration by individually titrating your primary and secondary antibodies. Test several dilutions and select the one that yields the highest signal-to-background ratio.
• Optimize conditions for individual antibody pairs (primary and conjugated secondary) separately, before attempting multi-color analysis.Steps and reagents to pay attention to in your protocol
• Membranes can autofluoresce, which may result in high background. Nitrocellulose membranes are considered to be the best option for low background compared to traditional PVDF membranes. If PVDF membranes are required, there are low fluorescence PVDF membranes available from some vendors.
• Like membranes, blocking buffers can autofluoresce thereby giving a higher background. Many vendors supply fluorescence-optimized western blot blocking buffer in both PBS- and TBS-based formats.
• Be wary of anything that can settle on the membrane and create fluorescent artifacts:
1) Pen marks can have some autofluorescence, so use a pencil.
2) Handle the membrane with care; use blunt forceps and avoid scratching/creasing to prevent fluorescent artifacts.
3) Undissolved particles within buffers, such as milk powder in blocking buffer, can potentially settle on the membrane and create fluorescent artifacts. Therefore, we suggest using high-quality reagents, allowing suitable time for all components to fully dissolve, and filter sterilize all buffers.
• Avoid membrane stripping if the goal of the experiment is accurate quantification or multiplexing.
• To avoid any chance of potential photobleaching, protect the membrane from the light during incubation and wash steps with aluminum foil.
• If using bromophenol blue in your loading dye, you should ensure your dye front is cut from the gel before the transfer, as this dye will transfer to the membrane and autofluoresce. If blotting a low molecular weight protein, we recommend using a fluorescent western blot loading dyes that lack bromophenol blue and don’t autofluoresce.
Figure 1 shows an example of fluorescent western blot performed with IRDye® secondary antibodies.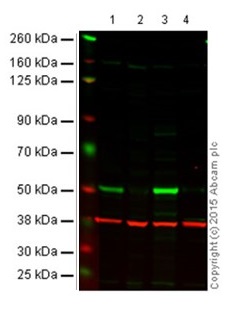
Figure 1. Western blot with goat anti-mouse IgG H&L (IRDye® 800CW) preadsorbed (ab216772). All lanes : Anti-p53 antibody [DO-1] - ChIP Grade (ab1101) at 1/1000 dilution (Anti-p53 antibody [DO-1]).
Lane 1: Wild-type HAP1 cell lysate (20 µg)
Lane 2: p53 knockout HAP1 cell lysate (20 µg)
Lane 3: A431 cell lysate (20 µg)
Lane 4 Saos-2 cell lysate (20 µg)
Secondary in all lanes: Goat anti-Mouse IgG H&L (IRDye® 800CW) preadsorbed (ab216772) at 1/10000 dilution.
This blot was produced using a 4–12% Bis-tris gel under the MES buffer system. The gel was run at 200V for 50 minutes before being transferred onto a nitrocellulose membrane at 30V for 70 minutes. The membrane was then blocked for an hour before being incubated with ab1101 overnight at 4°C. Antibody binding was detected using the Goat anti-Mouse IgG H&L (IRDye® 800CW) preabsorbed ab216772 at a 1/10,000 dilution for 1hr at room temperature and then imaged using the Licor Odyssey CLx.
The image shows a merged signal (red and green). Green – p53 (ab1101) observed at 53 kDa. Red - GAPDH loading control (ab181602), observed at 37 kDa using as secondary Goat Anti-Rabbit IgG H&L (IRDye® 680RD)- ab216777.4.2 Fluorescent western blot protocolNow that you understand the basics of fluorescent western blotting and things to consider when switching over from ECL, we’ll take you through the complete fluorescent western blot protocol.
Note: The reagents for this protocol are TBS-based. Some antibodies are optimized for a PBS-based experiment, in which case you should substitute all TBS-based reagents for PBS-based.Membrane blocking and probing with primary antibody
1. Place membranes in Petri dishes and cover with a high-quality TBS-based blocking buffer for 1 hour.
2. Dilute antibody in the same buffer used for blocking.
3. Incubate membranes with 10 mL of the primary antibody solution on a rocking platform. Optimal dilution and incubation times should be determined using serial dilutions and a time lapse, with the manufacturer's recommendations as a starting point.Washing the membranes and preparing the secondary antibody
1. Discard the primary antibody solution and begin washing steps, keeping the membrane in the original Petri dish or tray.
2. Wash the membrane with TBST using 2 brief rinses followed by enough buffer to cover the membrane for 1 x 15-minute wash. Perform 3 subsequent 10-minute washes at room temperature. Place the wash trays and Petri dishes on a rocker during the washes ensuring that the blots are washed separately.
3. Between washes, dilute the secondary antibodies in antibody dilution buffer. Ensure that the secondary antibody is thoroughly mixed with the dilution buffer. All secondary antibodies are light sensitive and should be covered with aluminum foil during incubation.
4. Discard the TBST and add the required amount of secondary antibody. Incubate the membrane with the corresponding secondary on the rocker at room temperature for 1 hour and protected from light.
5. After incubation, discard the secondary solution and repeat the washing procedure in Step 2, keeping the membrane in the original Petri dish or wash tray.
6. Once secondary washes have been completed, image the blots using your chosen platform. Always follow the manufacturer's instructions to achieve the best quality data.Tips for imaging
• Allowing membranes to dry can increase the sharpness and clarity of bands and thereby improve quantification accuracy.
• Imaging membranes wet can improve the detection of histone proteins.
• If using a ‘scanner’ imager (as opposed to a top-down camera imager), always wipe the scanning surface before use to prevent smearing on the image. Using 70% ethanol and a lint-free cloth is recommended.4.3 Video troubleshooting guideHaving been through all the steps in the fluorescent western blot protocol, you may find that some of your experiments require a little troubleshooting. This video takes you through some of the most common problems, like high background, weak signal, and non-specific bands, and what you can do to fix them.
SummaryYou should now be ready to take on fluorescent western blots. You’ll have a much better understanding of:
• The advantages of fluorescence vs ECL
• How to carry out a fluorescent western blot
• Where to find tips to help you get excellent results
And that concludes our Western blot training series. We hope you enjoyed it and feel better equipped to get the most out of your western blot.
If you feel ready, try taking our western blot quiz to test your new knowledge.
Be sure to keep an eye on the Abcam training page as our new training series for different applications become available.