
-
Western blot training
Part 2: Electrophoresis, protein transfer, visualization and membrane stripping
Welcome to our training series on western blot. We’ll guide you through western blot basics and essential protocols before moving on to optimization, troubleshooting, and more advanced techniques.In Part 2 of our series on western blot, we go through the key steps of western blot, such as electrophoresis, protein transfer and visualization, and membrane stripping for restaining, before introducing you to the full protocol.
Part 2 overview2.1 Electrophoresis
2.2 Protein transfer and visualization
2.3 Membrane stripping for restaining
2.4 The western blot protocol
2.1 ElectrophoresisAs discussed in Part 1, western blot uses specific antibodies to identify your proteins of interest. In the first step, the proteins are separated by size using an electrophoresis method SDS-PAGE (sodium dodecyl sulfate–polyacrylamide gel electrophoresis).
Electrophoresis can be one (with one plane of separation) or two dimensional. One-dimensional electrophoresis is used for most routine protein and nucleic acid separations. Two-dimensional electrophoresis is used for fingerprinting and allows us to accurately resolve all proteins present in a cell. Here we’ll focus on one-dimensional separation.
In the video below, we’ll explain how SDS-PAGE works, cover the basics of PAGE gel preparation, and go through buffer conditions for non-reduced and/or denatured electrophoresis.
PAGE gel preparationHere we’ll recap the essentials of the PAGE gel preparation from the video. The percentage of acrylamide in your gel will determine the rate of migration and the degree of separation between proteins. The smaller the size of your protein of interest, the higher the percentage of acrylamide you need, and vice versa.
Use the table below to choose an appropriate gel percentage based on protein size.Protein size, kDa Gel acrylamide, % 4–40 20 12–45 15 10–70 12.5 15–100 10 25–200 8
Note that acrylamide is a potent cumulative neurotoxin: always wear gloves when handling it.Tips for loading samples and running the gel
• Use special gel loading tips or a micro-syringe to load the complete sample into wells. Take care not to touch the bottom of the wells with the tip as this will create a distorted band.
• Never overfill wells. This could lead to poor data and poorly resolved bands if samples spill into adjacent wells.
• Load 10–40 µg of total protein per mini-gel well. Lower abundance proteins may require higher protein amounts per well.
• The gels should be submerged in a running buffer (see a buffer recipe in Part 1) normally containing SDS, except in native gel electrophoresis.
• Run the gel for the recommended time as instructed by the manufacturer; this can vary from machine to machine (eg 30 minutes to overnight depending on the voltage).
• When the dye (the migration front) reaches the bottom of the gel, turn the power off. Proteins will slowly elute from the gel at this point, so do not store the gel but proceed immediately to transfer.Molecular weight markers
Molecular weight markers enable us to determine the protein size (see Figure 1) as well as to monitor the progress of an electrophoretic run. A range of molecular weight markers is commercially available. Depending on the running buffer chosen, and consequent pH of the system, the apparent molecular weight of markers can change. The variance in pH between SDS-PAGE running buffers can affect the charge of the labeled protein standard and its binding capacity for SDS (demonstrated in figure 1), causing a shift in mobility and an apparent change in molecular weight.
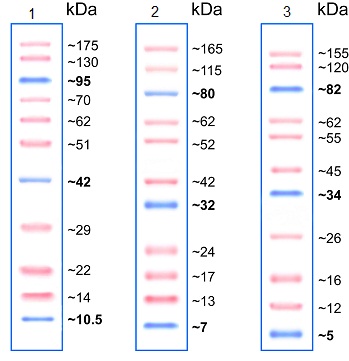
Figure 1. SDS-PAGE with Prestained Protein Ladder - Mid-range molecular weight (10–175 kDa) (ab115832) run with different SDS-PAGE buffer chemistries. Gel 1: Tris-Glycine 15%, Gel 2: Bis-Tris 4–12% MOPS buffer, and Gel 3: Bis-Tris 4–12% MES Buffer.Loading controls
In Part 1, we discussed the importance of including appropriate controls in each western blot experiment. Here we’ll focus on using loading controls for electrophoresis.
Loading controls are required to ensure that the lanes in your gel have been evenly loaded with samples, especially when comparing the protein expression levels between different samples. They are also useful to check for even transfer from the gel to the membrane across the whole gel. Where even loading or transfer have not occurred, the loading control bands can be used to quantify the protein amounts in each lane. For publication-quality work, the use of a loading control is essential.
You should select a loading control that has a different molecular weight to the protein of interest. This ensures that you will be able to distinguish between the bands.
Use the table below to select the right loading control for your sample type.
kDa Whole cell Mitochondrial Nuclear Membrane Cytoskeleton Serum 125 Vinculin 110 NaK ATPase 75 Transferrin 66 Lamin B1 60 HSP60 55 Alpha tubulin HDAC1 Alpha tubulin 50 Beta tubulin YY1 Beta tubulin Actin Actin 40 Beta-actin Beta-actin 35 GAPDH TBP 30 VDAC1/Porin PCNA Cyclophilin B 20 Cofilin COX IV Cofilin 15 Histone H3 2.2 Protein transfer and visualizationAfter separating your proteins by gel electrophoresis, you need to find out if your proteins migrated uniformly and then transfer them to a specialized membrane.
Visualization of proteins in gels
Protein visualization at this stage allows us to determine if proteins have migrated uniformly and evenly. Copper or Coomassie stains are two common solutions used for protein visualization. Use the copper stain if you plan to transfer the separated proteins to a membrane, as the Coomassie stain is irreversible. Only use the Coomassie stain on gels post-transfer to check the transfer efficiency, or if you have no plans to transfer and just want to observe the results of the SDS-PAGE separation.
Protein transfer
In this video, you’ll learn about the purpose of protein transfer and how it works. You’ll also find out the pros and contras of wet vs semi-dry transfer as well as some useful tips for transferring proteins >100 kDa.
Visualization of proteins in membrane with Ponceau RedTo check for transfer success, you can visualize the proteins using Ponceau Red. You can implement the following protocol:
1. Wash the membrane in TBST.
2. Dilute the stock Ponceau Red 1:100. The stock is made of 2% Ponceau S in 30% trichloroacetic acid and 30% sulfosalicylic acid.
3. Incubate on an agitator for 5 min, then wash extensively in water until the water is clear and the protein bands are well-defined.
4. The membrane may be de-stained completely by repeated washing in TBST or water. When using a PVDF membrane, re-activate the membrane with methanol, then wash again in TBST.
TBS 10x for 1 L:
• 24.23 g Trizma HCl
• 80.06 g NaCl
• Dissolve in 800 mL of distilled water
• Adjust pH to 7.6 with HCl
• Top up to 1 L
TBST for 1 L:
• 100 mL TBS 10x
• 900 mL distilled water
• 1 mL Tween 20
Note: Tween 20 is very viscous and will stick to the tip of your measuring pipettes. Be sure you add the right amount of the detergent to the Tris buffer. A 10% solution is easier to dispense than undiluted Tween 20.
Download the detailed protocol for protein transfer and staining, along with protein visualization development methods.
2.3 Membrane stripping for restainingStripping refers to the removal of primary and secondary antibodies from a western blot membrane and is used to investigate multiple proteins on the same blot (eg your protein of interest and a loading control). In these cases, stripping and re-probing a single membrane instead of running and blotting multiple gels will save you samples, materials, and time.
Avoid making quantitative comparisons of targets probed before and after stripping since the procedure removes some sample protein from the membrane. For the same reason, a stripped membrane should not be probed to demonstrate the absence of a protein. We recommend using a PVDF membrane to minimize the loss of sample protein.
The two stripping protocols in the table differ in the harshness of treatment. As a rule of thumb, try the mild stripping first and then proceed to the harsh one if there is still a signal from the antibody that you are trying to strip. These steps can be repeated for probing with several antibodies, though the potential signal may be weaker and the background higher after each round of stripping.Mild stripping Harsh stripping Buffer Buffer, 1L: Prepare buffer and strip membranes under a fume hood. 15 g glycine 1 g SDS Buffer, 0.1 L: 10 mL Tween 20 20 mL SDS 10% Dissolve in 800 mL distilled water 12.5 mL Tris HCl, pH 6.8, 0.5 M Adjust pH to 2.2 67.5 mL distilled water Bring volume up to 1 L with distilled water Add 0.8 mL ß-mercaptoethanol under the fume hood Procedure 1. Use buffer volume that will cover the membrane and incubate at room temperature for 5–10 min. 1. Warm the buffer to 50°C 2. Discard the buffer 2. Add the buffer to a small plastic box which has a tight lid; use buffer volume that will cover the membrane 3. Repeat incubation for 5–10 min with fresh stripping buffer 3. Add the membrane. Incubate at 50°C for up to 45 min with some agitation 4. Discard the buffer 4. Dispose of the solution as required for ß-mercaptoethanol based buffers 5. Wash for 10 min in PBS x 2 times 5. Rinse the membrane under running water tap for 1–2 min 6. Wash for 5 min in TBST x 2 times 6. Traces of ß-mercaptoethanol will damage the antibodies. Wash extensively for 5 min in TBST 7. Ready for blocking 7. Ready for blocking
The stripping efficiency can be checked by incubating the membrane with a chemiluminescent detection reagent. Note that using colorimetric/chromogenic detection reagents will leave a permanent visible stain on the membrane that can interfere with subsequent detection of targets of similar molecular weights. Chemiluminescent reagents such as ECL are recommended because they won’t leave a stain and are more sensitive than colorimetric reagents.
If stripping efficiency is satisfactory, rinse the membrane several times with buffer, then block before proceeding to the antibody incubation.2.4 The western blot protocolNow that you understand the main steps of the western blot procedure, the video below will take you through the complete western blot protocol from start to finish.
You can download a written protocol, which includes all the solutions and reagents you’ll need.
SummaryYou should now be fully equipped to run the entire western blot experiment. You will also have a much better understanding of:
• Different types of electrophoresis
• How best to transfer and stain your proteins
• Membrane stripping when you need to look at more than one protein per blot
In Part 3, we’ll show how to optimize and troubleshoot your western blots.
Start Part 3 now!