
-
Western blot training
Part 1: Experimental design and sample preparation
Welcome to our training series on western blot. We’ll guide you through western blot basics and essential protocols before moving on to optimization, troubleshooting, and more advanced techniques.In Part 1 of our series on western blot, we’ll take you through the basics of this incredibly popular and useful technique. You’ll get to grips with the essential information required before launching into the protocol itself.
Part 1 overview1.1 What is a western blot?
1.2 Antibody selection
1.3 Controls for western blot
1.4 Buffers and solutions
1.5 Sample preparation
1.1 What is a western blot?Western blot, or western blotting, is a technique widely used in research to separate and identify proteins. Western blot allows us to determine the relative protein levels between samples and establish the molecular weight of the target, which can provide insight into its post-translational processing. To achieve this, western blot implements three steps: (1) separation by size, (2) transfer to a solid support, and (3) visualizing target protein using primary and secondary antibodies.
In the first step, the proteins are separated based on size by gel electrophoresis. The gel is then placed next to the membrane, and the use of an electrical current induces the proteins to migrate from the gel to the membrane. Protein transfer to the membrane is essential because gels used for electrophoresis provide a poor surface for immunostaining, ie antibodies don’t stick to the proteins in the gel. The membrane can be further processed with antibodies specific for the target of interest and visualized using secondary antibodies and detection reagents.
In this video, we’ll recap the essential steps of western blot and show you a specific example of the interpretation of western blot results.1.2 Antibody selectionThe sensitivity and specificity of your western blot depend on the quality of the antibodies used. You should select a primary antibody raised in species different from that of your sample. If possible, choose a primary antibody that has been knockout (KO) validated to ensure it binds specifically to the intended target.
In this video, you’ll learn a few useful tips for choosing a primary antibody for western blot.
To visualize your protein, you need to select a secondary antibody that will bind to the primary antibody. Using an enzyme-linked secondary antibody, such as horseradish peroxidase (HRP) or alkaline phosphatase (AP), or a western blot-optimized fluorescence conjugate (eg IRDye®), offers a high level of sensitivity. Remember to check that the light emission wavelength of a conjugate is compatible with your reading device/scanner.
The increased sensitivity of conjugated secondary antibodies, compared to primary antibody only, results from these antibodies binding to the primary antibody at multiple locations, which amplifies the signal. The use of secondary antibodies is therefore ideal for western blot since their signal amplification allows for easier detection of the protein of interest in the middle of a complex protein mixture.
Using directly conjugated primary antibodies (eg HRP-conjugates) in western blot allows you to speed up and simplify the protocol, omitting the need for secondary antibody staining step. When choosing primary antibody conjugates, pay attention to antibody specificity. Ideally, go for recombinant monoclonal antibodies, which provide high specificity and batch-to-batch consistency.
Compared to secondary antibodies, primary conjugates don’t provide signal amplification, so your protein of interest should be abundant in the sample. Abcam offers a wide range of primary recombinant antibodies directly conjugated to HRP suitable for western blot. If your antibody of choice is not available in a suitable conjugated format, you can use Abcam’s antibody conjugation kits.1.3 Controls for western blotIt’s essential to include controls in every experiment, and western blot is no exception. Controls help you to recognize unexpected sources of error, both random and systemic, and fix these before they compromise your results.
Positive control lysate
A positive control lysate is a lysate from a cell line or tissue sample known to express the protein you are detecting. A positive result from the positive control, even if the test samples are negative, will indicate that the procedure and reagents are optimized and working. It will, therefore, verify the validity of any negative results. On the contrary, a negative result in the positive control lane suggests that at least one of the steps in your protocol didn’t work correctly or there’s a problem with your antibody.
Tip: If the expression of your target protein isn’t well characterized, use a lysate from cell lines or tissues overexpressing your protein of interest as a positive control.
We recommend you check the antibody datasheet, which will often provide a suggested positive control. Always ensure the tissue or cell line you use is from a tested species. Not all the datasheets will have a suggested suitable control, and we recommend the following in these circumstances:
• Check if there are any Abreviews for the antibody. Any tissues, cells, or lysates that have been used successfully by these customers can be considered a suitable positive control.
• Check the Swiss-Prot or Omnigene database links on the datasheet. These databases will often have a list of tissues expressing your protein of interest. These can also be considered suitable positive controls.
• Check the GeneCards or Human Protein Atlas entry for the protein. This will usually provide you with relative levels of expression in various tissues and/or cell lines.
• If you still have difficulty finding a suitable control, we recommend doing a quick literature search on PubMed to see which tissues and cells express the protein of interest.
If you are using online databases such as Swiss-Prot, omnigene, or Human Protein Atlas, consider where the data has come from. Thus, the data based on mRNA expression may not correlate well with detectable protein levels.Negative control lysate
Negative control lysate is a lysate from a cell line or tissue sample known not to express the protein you are detecting. A negative control will allow you to check for non-specific binding of your antibody and false-positive results.
Tip: Use a lysate from a validated knockout cell line or tissue sample as a negative control.Loading controls
Loading controls are proteins that exhibit high-level, constitutive expression in the cell type or sample that you are studying – housekeeping genes are usually good choices such as actin, GAPDH, tubulin, or mitochondrial proteins. Loading controls confirm that protein loading is the same across the gel and, therefore, help to normalize the protein levels you detect. Loading controls ensure the reliability of your data between samples since the expression levels of the loading control should remain consistent between the different sample types.
Please see below an example showing the use of negative and loading controls in western blotting (Figure 1).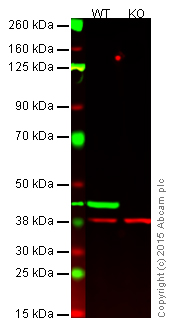
Figure 1. Western blot with anti-beta actin antibody [AC-15] (ab6276).
Lane 1: Wild-type HAP1 cell lysate (20 µg).
Lane 2: Beta-actin knockout HAP1 cell lysate (20 µg), used as a negative control.
Lanes 1 and 2: Merged signal (red and green). Green - beta-actin (ab6276) observed at 42 kDa. Red - loading control (ab181602) observed at 37 kDa. Ab6276 was shown to specifically react with beta-actin in wild-type HAP1 cells (lane 1).
No band was observed in the negative control (beta-actin knockout cell lysate in lane 2).Endogenous control lysate
We recommend including an endogenous control if you are testing a sample of recombinant protein. Folding of the recombinant protein may be different from the endogenous native form and may prevent access of the antibody to the epitope. Always ensure the recombinant protein includes the immunogen sequence for the antibody you are using. An endogenous positive control is important to validate the results, as well as to indicate how well the reagents (eg antibodies) and protocol are working.No primary antibody control
This is when you add only a secondary antibody. This control can indicate the occurrence of non-specific binding of the secondary antibody. This is a particularly important step when optimizing a multiplexed western blot, as it confirms secondary antibodies do not interfere with each other and cause off-target binding.
1.4 Buffers and solutionsYour western blot experiment will require several buffers and stock solutions. Getting these just right and prepared in advance, where possible, will save you time further along in the process.
These buffers and solution include the following essentials:
Lysis buffers
Lysis buffers differ in their ability to solubilize proteins, with those containing sodium dodecyl sulfate (SDS) and other ionic detergents considered to be the harshest and, therefore, most likely to give the highest yield.
The main consideration when choosing a lysis buffer is whether the chosen antibody will recognize denatured samples. When this is not the case, it will be noted on the antibody datasheet, and buffers without detergent or with relatively mild non-ionic detergents (NP-40, Triton X-100) should be used.
Protein location and lysis buffer choice
Protein location Buffer recommended Whole cell NP-40 Cytoplasmic (soluble) Tris-HCl Cytoplasmic (cytoskeletal bound) Tris-Triton Membrane bound NP-40 or RIPA Nuclear RIPA or use nuclear fraction protocol Mitochondria RIPA or use mitochondrial fraction protocol
Loading, running, transfer, and blocking buffers
• Loading buffer/Laemmli 2X buffer
• Running buffer (Tris-Glycine/SDS)
• Transfer buffer (wet and semi-dry)
• Blocking buffer
For recipes of western blot buffers and stock solutions, check out this guide.
1.5 Sample preparationSample preparation can have a significant impact on the quality of your western blot. Here’s a quick introduction on how to prepare a good sample for western blot.
Download the full protocol for western blot sample preparation.Summary
You should now have a better idea of the basic steps for your next western blot experiment. Here’s a quick rundown:
• Select your primary antibody based on your species and research needs
• Using a secondary antibody will provide increased sensitivity compared to a conjugated primary antibody
• Use the appropriate positive and negative controls
• Prepare the right buffers and solutions in advance
• Take time to prepare your samples as carefully as possible
In Part 2, we’ll introduce you to the full western blot protocol, including gel electrophoresis, protein transfer, and membrane stripping for restaining.
Start Part 2 now!