
-
IHC training
Part 3: Detection
Welcome to our training series on immunohistochemistry (IHC). We begin with essentials like sample preparation and antibody selection and then guide you through immunostaining protocols and troubleshooting.With tissue processing, sample preparation, antibody selection, and IHC protocol steps covered, it’s time to move on to the fun part of seeing your results. Here you can find useful information to help you get crisp and accurate IHC images.
Part 3 overview3.1 Counterstains
3.2 Multicolor staining
3.3 Mounting media
3.4 IHC video protocol for paraffin-embedded sections
3.5 Controls
3.1 CounterstainsCounterstains are used in IHC to stain structures, usually nuclei or membranes, within the tissue section to help visualize the tissue and put the staining into context. Counterstains can be chromogenic or fluorescent.
It is important to use a counterstain that provides good color contrast and doesn’t interfere with the other reagents in the assay, such as the color of the chromogen used.
Chromogenic counterstains
• Chromogenic counterstains are used when the primary antibody is visualized using HRP or alkaline phosphatase combined with DAB, AEC, or similar enzyme substrates.
• For chromogenic IHC, hematoxylin is the most commonly used counterstain, staining the cell nuclei blue (Figure 1). Most hematoxylin stains can be used either progressively or regressively.o Progressive hematoxylins (eg Mayer's, Gill's, and Carazzi's) are incubated until the desired degree of staining is observed.
o Regressive hematoxylins (eg Harris's) initially get overstained, and excess staining is then removed is by immersion into acid.• Common nuclear counterstains are light green, fast red, toluidine blue, and methylene blue; they stain nuclei either green, red, or blue.
• Nuclear counterstain should not be too strong when detecting nuclear antigens - or it could mask the positive staining.
• For cytoplasmic staining, eosin is often used in combination with hematoxylin.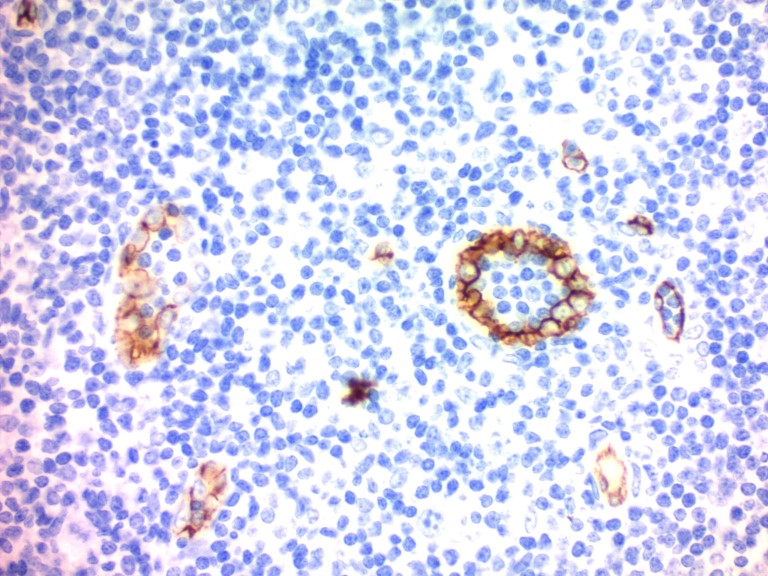
Figure 1. Immunohistochemistry (Formalin-fixed paraffin-embedded sections) - Hematoxylin Solution (Mayer's, Modified) (ab220365). Immunohistochemistry staining with CD34 on human tonsil. Counterstained with Hematoxylin Solution (Mayer's, Modified) (ab220365) for 30 seconds followed by bluing with Bluing Reagent.
Fluorescent counterstains
• Fluorescent counterstains (Figure 2) are used when the primary antibody staining is visualized with a fluorescent dye either directly conjugated to the primary antibody, or a secondary antibody.
• You can use chemicals such as DAPI, or fluorescent molecules such as Alexa Fluor®-conjugated lectins (eg wheat germ agglutinin to stain cell membranes).
• DAPI is the most popular fluorescent nuclear counterstain, staining the cell nuclei blue.
• You must be able to distinguish the signals from your secondary antibody (or directly conjugated primary) and counterstain. So choose counterstains of a different color or sufficiently different absorption/emission spectra to the detection system.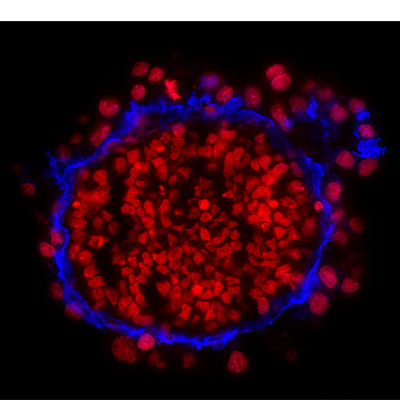
Figure 2. Immunohistochemistry on frozen sections of mouse embryonic stem cell-differentiated embryoid bodies with DRAQ7™. Nuclei were counterstained with far-red fluorescent dye DRAQ7™ (ab109202). (Courtesy of Dr. Shaohua Li, UMDNJ-Robert Wood Johnson Medical School)
For more information on counterstains and special stains, please see our guide.3.2 Multicolor stainingIn some cases, it may be useful to do multicolor staining to visualize the cellular localization of two or more antigens in the tissue section, for example, to see if proteins colocalize.
Fluorescent detection is commonly used to visualize multiple antigens simultaneously.
When designing multicolor experiments, two key parameters must be considered:
1. If using indirect detection methods, avoid cross-reactivity between the detection reagents (where possible). This is usually achieved by selecting primary antibodies from different species, ensuring that each secondary antibody only recognizes one primary antibody in the experiment.
2. Choose fluorochromes with minimal spectral overlap. For this purpose, we provide nine different Alexa Fluor dyes conjugated to secondary antibodies reactive to different species.
Our video explains how to choose a combination of fluorochromes.Although a wide range of fluorescent reporter labels is available, fluorescent multicolor imaging has also some limitations:
• When in proximity to each other, fluorochrome signals can be quenched due to energy transfer from one excited fluorochrome to the other (resonance energy transfer).
• Fading (photo-bleaching) of the fluorescent signal can occur during storage/analysis.
• Specimen autofluorescence is exacerbated by aldehyde fixation.
Multicolor IHC is also possible when using chromogen combinations that provide two or more end-product precipitate colors. Abcam has a range of multicolor IHC detection kits that have been optimized for multicolor experiments and offer reduced background, better signal-to-noise ratio, and flexible color combinations.
Find Alexa Fluor secondary antibody for fluorescent IHC here.
Learn more about our kits for multicolor chromogenic IHC.
3.3 Mounting mediaAfter IHC staining, mounting media are used to adhere a coverslip to a tissue section or cell smear. Mounting a tissue specimen is essential for preservation during storage as well as for enhancing image quality during microscopy.
There are two categories of mounting media: organic (hydrophobic) and aqueous (hydrophilic). Organic mounting media can only be used for enzymatic labels where the precipitate formed between the enzyme and the chromogen is not soluble in the organic solvents used during the mounting of the tissue (eg diaminobenzidine, DAB). Aqueous mounting media are generally suitable for all enzymatic label/chromogen combinations and fluorescent labels.
Check out our recommendations for mounting media for fluorescent and non-fluorescent imaging.
3.4 IHC video protocol for paraffin-embedded sectionsNow that you understand the main steps of the IHC procedure, the video below will take you through the complete IHC protocol for paraffin-embedded sections from start to finish.
3.5 ControlsLike with all experiments, it is essential to run controls in IHC staining to confirm that the observed staining pattern is true, accurate, and reliable. Controls fall into two categories:
• Antigen (tissue) controls
• Reagent controls
Antigen tissue controls
• Positive control: a section from a tissue known to express your protein of interest. A positive result from the positive control, even if the samples are negative, will indicate that the procedure and the reagents are working and optimized. It will verify the validity of any negative results.
• Negative control: a section from a tissue known not to express the target antigen. This is to check for non-specific signals and false-positive results.
• Endogenous tissue background control: a section from the tissue before applying the primary antibody. Certain tissues have inherent properties that result in background staining, which could affect the interpretation of results. For example, certain tissues contain endogenous fluorescent molecules that could be confused for positive staining during fluorescent IHC. The tissue should be checked under the microscope using either fluorescent or bright-field illumination (for fluorescent or chromogenic labels, respectively) to ensure that there is no endogenous background.
Please see below an example of using a knockout tissue as a negative control for IHC staining (Figure 3). You can see that TMEM119 knockout mouse brain tissue (bottom) show no expression of TMEM119 (red).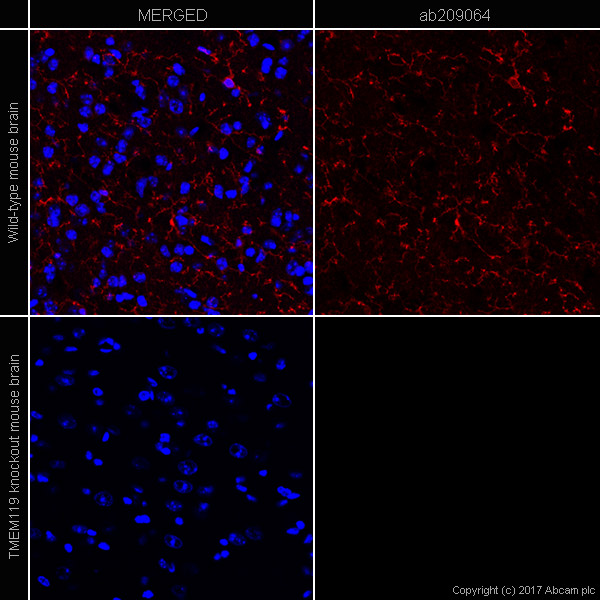
Figure 3. IHC image of TMEM119 (ab209064, microglial marker) staining in a section of frozen normal mouse brain wild type (upper panel) and TMEM119 knockout (lower panel). Red is anti-TMEM119 (ab209064) with goat anti-rabbit IgG H&L (Alexa Fluor® 647) (ab150087), and blue is nuclear DNA labeled with DAPI.
Reagent controls
• No primary antibody control: tissue is incubated with the antibody diluent alone and no primary antibody, followed by incubation with secondary antibodies and detection reagents. This ensures that staining is produced from the detection of the antigen by the primary antibody and not by the detection system or the specimen.
• Isotype control: tissue is incubated with the antibody diluent and a non-immune antibody of the same isotype and at the same concentration as the primary antibody, followed by incubation with secondary antibodies and detection reagents. This control checks that the observed staining is not caused by non-specific interactions of the antibody with the tissue. Any background staining observed with this control should be negligible and distinct from specific staining. This control can be used when working with monoclonal primary antibodies.
• Absorption control: tissue is incubated with pre-absorbed antibody instead of the primary antibody, followed by incubation with secondary antibodies and detection reagents. As this control is performed to demonstrate that the antibody binds specifically to the antigen of interest, little or no staining is expected. A pre-absorbed antibody may be produced by overnight incubation of the antibody at 4°C with a large molar excess (10-fold) of the immunogen. Absorption controls are more reliable if the immunogen is a peptide, as antibody-protein immunogen mixtures may themselves cause high background staining in tissues due to non-specific interactions between the protein and the tissue.
SummaryYou should now have all the information to go ahead with:
• Counterstaining
• Single or multicolor immunostaining
• Mounting of your tissues
• Choosing appropriate IHC controls
In Part 4, we conclude with solutions to the most common problems and issues you’re likely to face during your IHC experiments.
Start Part 4 now!