
-
IHC training
Part 2: Immunostaining
Welcome to our training series on immunohistochemistry (IHC). We begin with essentials like sample preparation and antibody selection and then guide you through immunostaining protocols and troubleshooting.In Part 2 of our IHC training, you’ll learn how to stain your tissues. We’ll run through the IHC protocol steps, such as antigen retrieval, permeabilization, and blocking. We’ll also discuss how to choose the appropriate primary and secondary antibodies and which detection system you should use to get the best results.
Part 2 overview2.1 Antigen retrieval
2.2 Permeabilization
2.3 Blocking
2.4 Selection of primary antibodies and direct vs indirect methods
2.5 Choosing your secondary antibody
2.1 Antigen retrievalMost formalin-fixed tissues require an antigen retrieval step before the incubation with a primary antibody. During aldehyde fixation, cross-links between the fixative and tissue proteins are formed, and this can mask antigenic sites. Antigen retrieval methods break these bridges and expose antigenic sites, allowing antibodies to bind their target proteins. The two methods for antigen retrieval are heat-induced epitope retrieval (HIER) and enzymatic or proteolytic-induced epitope retrieval (PIER).
Find out the main differences between HIER and PIER in the video below.
To summarize the advantages and disadvantages of both antigen retrieval methods:
• HIER allows for gentler epitope retrieval and more definable parameters, but heating methods can result in unbalanced epitope retrieval through the formation of hot and cold spots, and rigorous boiling can lead to tissue dissociation from the slide.
• PIER is useful for epitopes that are difficult to retrieve, but enzymatic retrieval can sometimes damage tissue morphology (concentration and timing need to be optimized).
The preferred method for optimal antigen retrieval depends on the tissue, fixation, and primary antibody. A starting point for selecting the appropriate antigen retrieval method is to test two methods of HIER (for example, using citrate buffer pH 6 and Tris-EDTA pH 9) and one or two methods of PIER (for example, using proteinase K and/or trypsin). For frozen sections, antigen retrieval is not required as the fixation time with aldehydes is very short (10–30 minutes) and doesn’t allow the formation of cross-links.
Figure 1 illustrates the benefit of optimizing antigen retrieval to improve staining.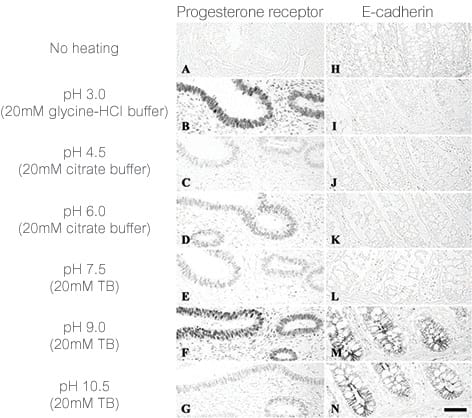
Figure 1. Effect of pH on heat-mediated antigen retrieval in human tissues. From Emoto, et al. Mechanisms of heat-induced antigen retrieval: does pH or ionic strength of the solution play a role for refolding antigens? J Histochem Cytochem 53, 1311–1321 (2005).
Learn more about antigen retrieval methods in this guide.
Get the antigen retrieval protocol.2.2 PermeabilizationPermeabilization is required when the antibody needs to access the cell interior to detect the target antigen. Such antigens include intracellular proteins and cytoplasmic epitopes of transmembrane proteins. Solvents or detergents are typically used for permeabilization.
Solvents can be used after fixation with a crosslinking agent such as formaldehyde – we recommend this for cytoskeletal, viral, and some enzyme antigens.
Detergents can either be harsh (eg Triton™ X-100 or NP-40) to disrupt proteins, or mild (eg Tween 20®, saponin or digitonin) to not dissolve plasma membranes. Detergent permeabilization can significantly improve antibody access to antigens in the cytoplasm, on the cytoplasmic face of the plasma membrane, and soluble nuclear antigens.
Solvent and detergent guidelinesSolvents Comments Solvents Acetone Acetone fixation will also permeabilize Methanol Methanol fixation can be used to permeabilize but is not always effective Detergents Triton™ X-100 or NP-40 Use 0.1–0.2% in PBS for 10 min only Tween 20®, saponin, digitonin, and Leucoperm Use 0.2–0.5% for 10–30 min
2.3 BlockingBlocking with sera or a protein blocking reagent is essential to prevent non-specific binding of antibodies to tissue or Fc receptors (a receptor that binds the constant region (Fc) of an antibody). Blocking reduces the amount of background potential and false-positive results.
Blocking options include:
• BSA (bovine serum albumin) protein or sera blocking, to prevent non-specific binding of antibodies to tissue or Fc receptors.
• Biotin blocking by pre-incubating the tissue with avidin, followed by incubation with biotin to block additional biotin binding sites on the avidin molecule, when using a biotinylated secondary antibody.
• Blocking with endogenous enzymes when relying upon chromogenic detection (blocking of endogenous peroxidase).
Watch the video below to learn how to perform efficient blocking.
You can read more about the advantages and limitations of various blocking methods in our full guide on blocking for IHC.
2.4 Selection of primary antibodies and direct vs indirect methodsImmunostaining (or immunodetection) relies on the specificity of the primary antibody for the target antigen. The method of detecting a primary antibody that is bound to the antigen of interest can be either direct or indirect. In direct detection methods, the primary antibody is directly conjugated to a label. During indirect detection, the primary antibody is bound by a labeled secondary antibody that has been raised against the host species of the primary antibody.
In both methods, the antibody is visualized using either a fluorescent label or an enzyme that converts a soluble substrate into an insoluble chromogenic product.
In this video, we guide you through all the essential steps for successful immunostaining:
• How to choose a good primary antibody
• When to use direct vs indirect detection
• How to choose between chromogenic or fluorescent labels
Download our IHC staining protocol for paraffin, frozen, and free-floating sections.
2.5 Choosing your secondary antibodyWhen choosing a secondary antibody for your IHC experiments, consider the following points:
• Biotin conjugates (Figure 2) continue to be widely used secondary antibodies since then can amplify your signal (by using an ABC complex) to detect low-abundance proteins.
• HRP-polymer secondary antibodies eliminate endogenous biotin background in your IHC experiments and allow a great signal amplification.
• Pre-adsorbed secondary antibodies are useful for multicolor analysis to ensure low cross-species reactivity.
• Fragment antibodies are smaller and penetrate tissues more efficiently.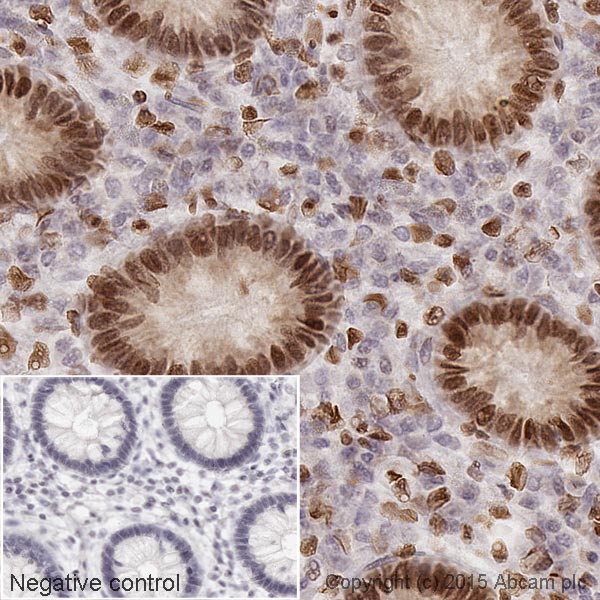
Figure 2. Goat Anti-Mouse IgG H&L (Biotin) (ab6788). IHC image of Histone H1 staining in a section of formalin-fixed paraffin-embedded human normal colon. The section was pre-treated using pressure cooker heat mediated antigen retrieval with sodium citrate buffer (pH6) for 30 minutes. The section was then incubated with ab11080, 1/1000 dilution, for 15 minutes at room temperature. A goat anti-mouse biotinylated secondary antibody (ab6788, 1/1000 dilution) was used to detect the primary and visualized using an HRP conjugated ABC system. Streptavidin HRP was used, ab7403 at a 1/10,000 dilution. DAB was used as the chromogen (ab103723), diluted 1/100, and incubated for 10 minutes at room temperature. The section was then counterstained with hematoxylin and mounted with DPX.
Take a look at the complete IHC secondary antibody guide here.
SummaryYou should now be entirely up to speed on the IHC staining steps, including:
• The two main approaches to antigen retrieval
• The differences between direct and indirection detection, as well as chromogenic and fluorescent labels
• The main considerations for choosing primary and secondary antibodies
In Part 3, we’ll cover counterstains, multicolor staining, and finally how to mount your slides to get those beautiful IHC images you’ve always dreamed of. We’ll also discuss how to choose the appropriate controls to make sure you are getting accurate and reliable results.
Start Part 3 now!