
-
Flow cytometry training
Part 3: compensation and data analysis
Welcome to our training series on flow cytometry. We begin with essentials like getting to know your cytometer, before taking you through some of the finer points and ending with how to get the most from this powerful technique.It’s Part 3 of flow cytometry training, and it’s time to get some data. In this part, we walk you through experimental design and compensation setup for multicolor experiments. And we end with a visual guide on dealing with your data.
Part 3 overview3.1 Experimental design
3.2 Compensation
3.3 Running a flow cytometry experiment and visualizing your data
3.1 Experimental designIn the previous parts, we’ve covered the flow cytometry basics, sample preparation, and different staining protocols. Let’s see how we can apply our learnings to design a flow cytometry experiment.
1. Get to grips with your flow cytometer. Be aware of the number and type of lasers, the number of detectors, and the type of filters. Match the excitation wavelength of your fluorochromes to the lasers available and match the emission wavelength of your fluorochromes to the filters.
2. Pick a fluorophore based on your needs: the brightest fluorochromes for targets of low or unknown antigen expression and low cell numbers, and dimmer fluorochromes for targets with high antigen expression.
3. Take account of any spectral overlap.
4. Use proper controls, like unstained cells, live/dead markers, single-staining positive controls, and fluorescence-minus-one-staining.
5. Decide on whether you’re using indirect or direct staining, and then optimize antibody concentrations and use Fc blocking where needed.
In this video, we’ll take you through all aspects of experimental design, including materials, controls, and reagents, so that you’ll be able to develop complex flow cytometry experiments.
Here’s a quick visual guide to help you design multicolor panels for flow cytometry.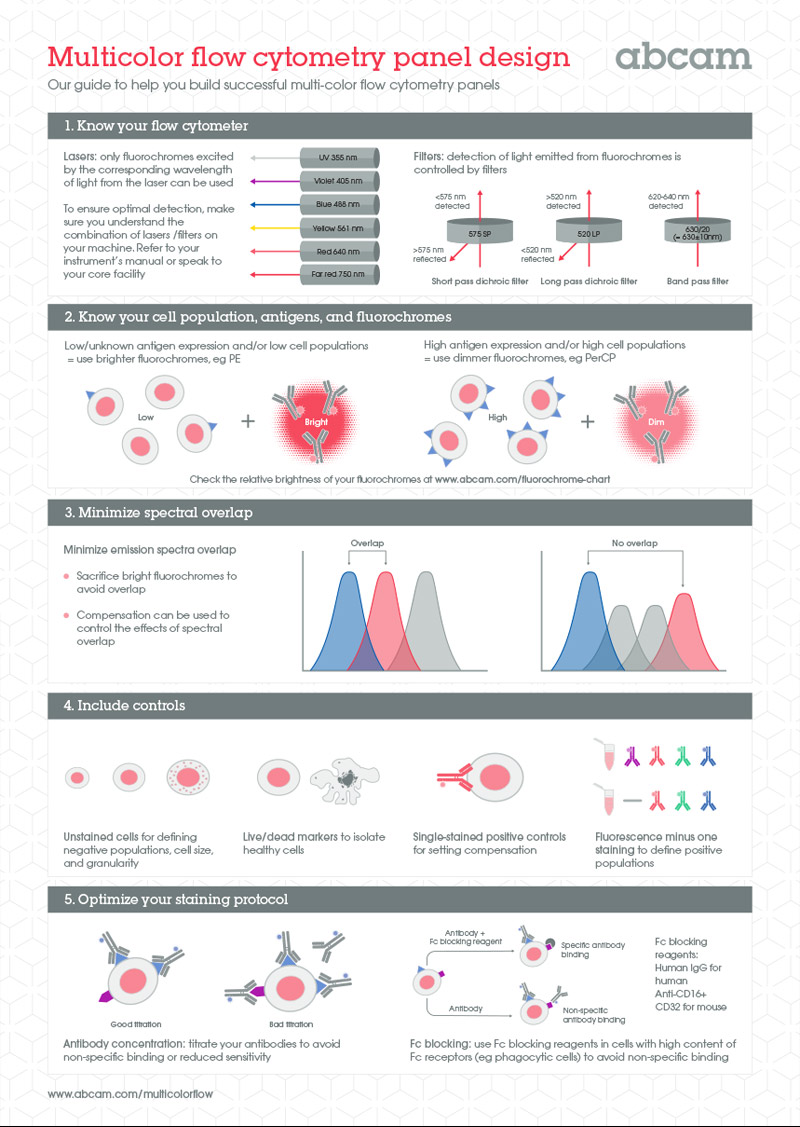
When conducting a multicolor flow cytometry experiment, you can use directly conjugated primary antibodies (eg to Alexa Fluor® dyes), which allow you to speed up and simplify the protocol, omitting the need for secondary antibody staining step. When choosing primary antibody conjugates, pay attention to antibody specificity. Ideally, go for recombinant monoclonal antibodies, which provide high specificity and batch-to-batch consistency.
Abcam offers a wide range of primary recombinant antibodies directly conjugated to a variety of fluorescent labels (Alexa Fluor® dyes, FITC, PE, APC, PerCP), validated for flow cytometry. If your antibody of choice is not available in a suitable conjugated format, you can use Abcam’s antibody conjugation kits.
Get our full Multicolor flow cytometry guide to help you build the perfect multicolor experiment.
3.2 CompensationMulticolor flow cytometry is incredibly useful if you need to generate a substantial amount of data in a relatively short period. By using multiple antibodies against multiple proteins on a cell, you can build up a much more detailed picture from less amount of sample than if you’d performed a serial analysis.
However, since multiple primary antibodies require multiple fluorophores to distinguish between them, emission spectra can overlap, which leads to false-positive signals as you detect fluorescence from more than one fluorophore in a single channel. Compensation is the process you use to account for overlapping emission spectra when running multicolor flow cytometry experiments.
In this video, we’ll give you some guidance on how to choose fluorochromes for the multicolor flow cytometry and perform multicolor compensation.Carrying out fluorescent compensation is essentially the same on any cytometer. Here are some general pointers:
• Some fluorochrome combinations should be avoided (eg APC and PE-Cy5) given the high degree of emission overlap.
• You need compensation controls for each fluorochrome, and these should have both positive and negative populations.
• Generally, compensate with the fluorochromes from the far-red end of the spectrum (higher wavelength) stepwise down to those fluorochromes at the lower end of the spectrum. Do not forget to check the compensation in all channels.
• You correctly set your compensation when the median of the negative population is equal to the median of the positive population in the spill-over channel.
This short video shows you a specific example of how to perform compensation for a three-color experiment.For more details on how to perform compensation, check out our guide.
3.3 Running a flow cytometry experiment and visualizing your dataNow when you know how to design your flow cytometry experiment and set up compensation controls, you are ready to run your experiment. The video below will take you through the main steps of the flow cytometry experiment.
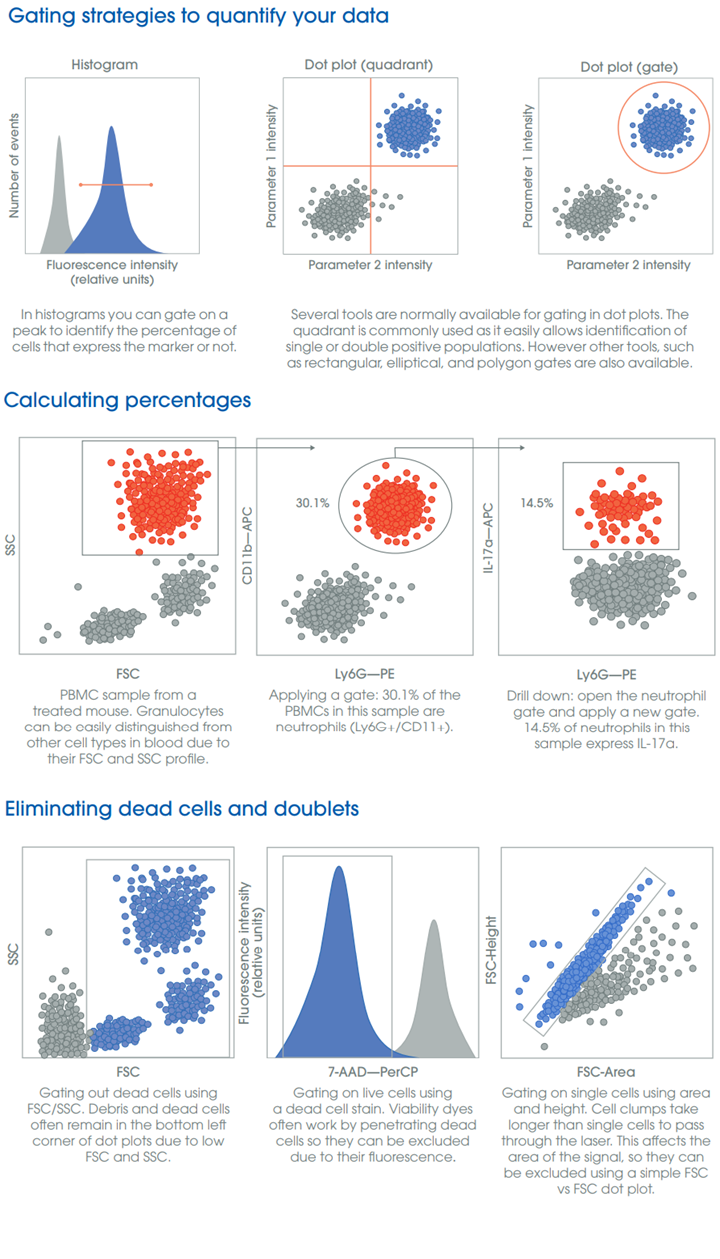
There are multiple ways to visualize and analyze your data, and no one way is inherently right or wrong. Here’s some information on how to understand which approach represents your data in the best way.
• Histograms: these work best when most cells express a marker of interest, and the staining is bright. The mean fluorescence intensity (MFI) is a measure of brightness and a relative measure of abundance.
• Dot plots: depending on your sample, you may be able to delineate cell populations using only FSC/SSC for further analysis. Typically, however, using two fluorescent markers will allow you to separate your population more clearly if more than one cell population in your sample has similar FSC/SSC profile or shares markers with other cell types.
• Gating: drawing gates allows you to quantify your populations. Remember that a gate represents a subset of your total population. If you drill down on a population and gate within that, you will then need to back-calculate to your total population.
In this video, you’ll learn the different ways to visualize your data.Here's a visual reminder on gating strategies, calculating percentages, and eliminating dead cells and doublets.
Summary
And that concludes our data-focused Part 3. You should be fully equipped to:
• Design a flow cytometry experiment
• Set up compensation for multicolor flow cytometry
• Run your samples at flow cytometer and visualize your data
In our final part, we’ll cover troubleshooting, so that you can quickly overcome some of the most common issues in flow cytometry.
Start Part 4 now!