
-
ChIP training
Part 2: Protocols
Welcome to our training series on chromatin immunoprecipitation (ChIP). We'll show you ChIP basics and essential protocols before moving on to optimization, troubleshooting, and more advanced techniques.In Part 2 of our series on ChIP, we’ll introduce you to the cross-linking and native ChIP protocols. Also, we’ll show some useful chromatin preparation protocols for performing ChIP with tissues and plant-based samples.
Part 2 overview2.1 ChIP protocol overview
2.2 Cross-linking vs native ChIP protocols
2.3 Chromatin preparation from tissues
2.4 Chromatin preparation from plant samples
2.1 ChIP protocol overviewAs we learned in Part 1, the ChIP procedure utilizes an antibody to immunoprecipitate a protein of interest, such as a transcription factor, along with its associated DNA. The associated DNA is then recovered and analyzed by PCR, microarray, or sequencing to determine the genomic sequence and location where the protein was bound.
There are two main types of ChIP that you may use:
1) Cross-linking ChIP (X-ChIP) – can be used for any proteins but must be used to analyze proteins weakly bound to DNA
2) Native ChIP (N-ChIP) - commonly used to analyze histone modifications
We’ll cover protocols for both methods in more detail below. The overall protocol for each of these is very similar: you obtain a chromatin sample that will be fragmented. Next, you incubate the fragmented chromatin with an antibody specific for your protein or histone modification of interest. Finally, you analyze the pulled-downed DNA using qPCR or ChIP-seq. This video will take through all the steps of the ChIP protocol.
Figure 1 shows a step-by-step ChIP workflow.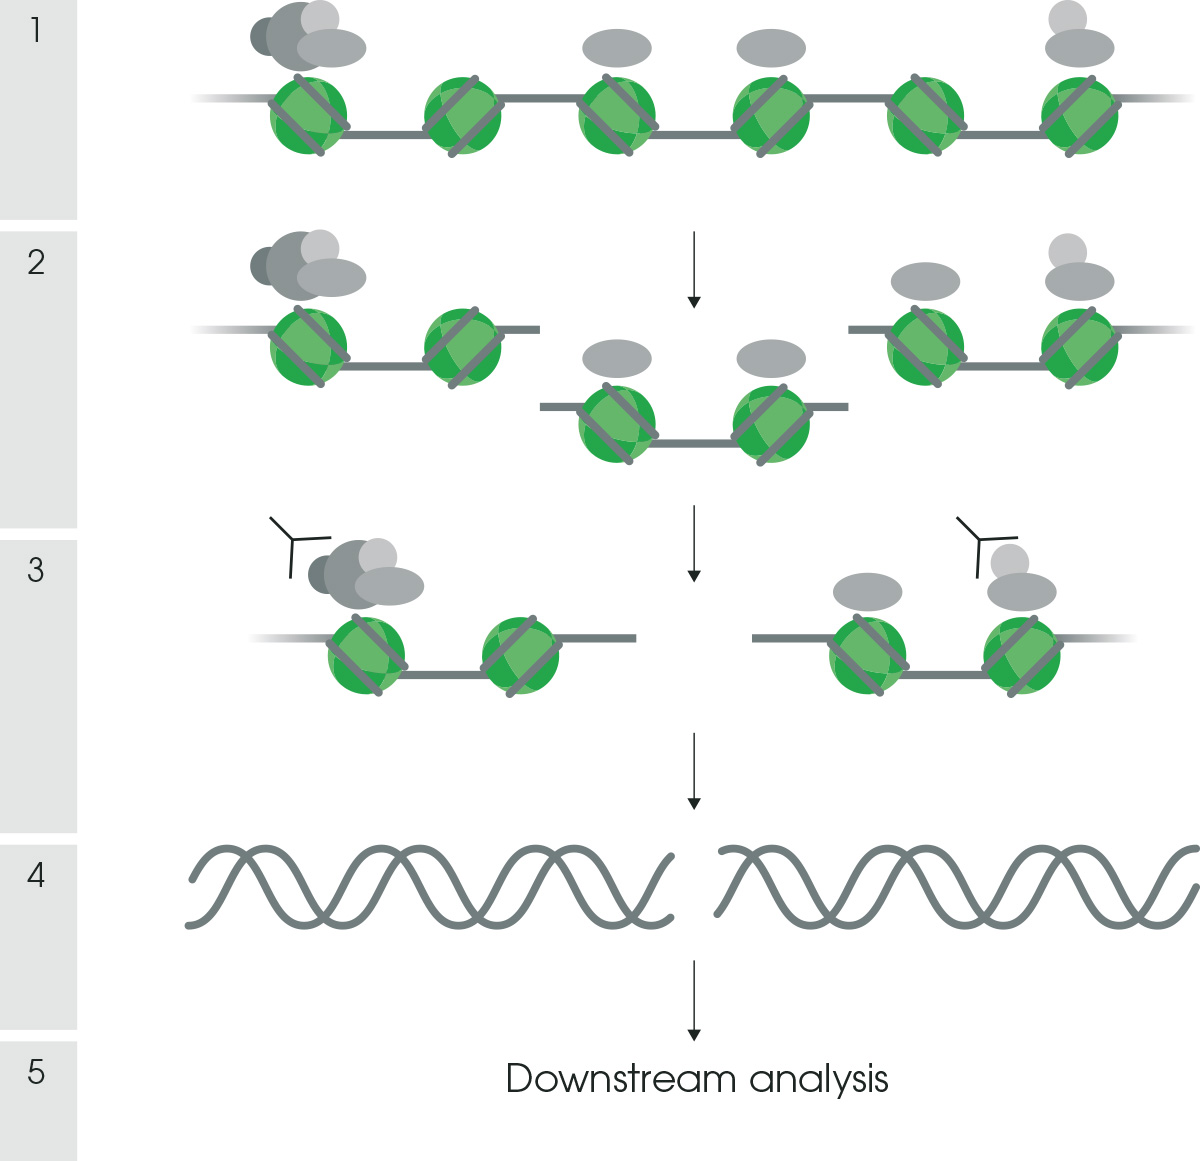
Figure 1. ChIP protocol workflow. A step-by-step approach to carry out a ChIP experiment, where 1 - cross-linking, 2 – chromatin fragmentation, 3 – immunoprecipitation, 4 – DNA recovery and purification, 5 – DNA analysis.2.2 Cross-linking ChIP (X-ChIP) vs Native ChIP (N-ChIP)Now that you have a good idea of what to expect from a ChIP experiment, we’ll go through the two main protocols. X-ChIP and N-ChIP protocols differ in chromatin preparation, including cross-linking and chromatin fragmentation steps. X-ChIP uses a cross-linking step, eg formaldehyde treatment, to fix the antigen of interest to its chromatin binding site. Histones, however, generally do not require cross-linking, as they are already tightly associated with the DNA. Therefore, N-ChIP protocol, commonly used for histones and their modifications, doesn’t include any cross-linking steps.
Non-histone proteins, such as transcription factors and proteins contained in DNA-binding complexes, will most likely require cross-linking. Keep in mind that the further away from the DNA your interaction of interest lies, the less effective ChIP will be without cross-linking.
N-ChIP and X-ChIP both require chromatin fragmentation to make interactions accessible to antibodies, but they implement different fragmentation procedures utilizing micrococcal nuclease or sonication, respectively.
The video below compares the advantages and disadvantages of N-ChIP vs X-ChIP and helps you to choose the right method.
A dual cross-linking ChIP (dual-X-ChIP) method allows us to efficiently bind transcription factors to DNA within the chromatin sample. This type of double cross-linking is very effective when you are using ChIP to observe the binding pattern of transcription factors bound directly to DNA or even those found in DNA-binding complexes not bound directly to DNA. The dual-X-ChIP protocol includes both formaldehyde and EGS (ethylene glycol bis (succinimidyl succinate)) to dual cross-link the proteins to the DNA, as well as to capture protein-protein interactions.
Once you have identified the most appropriate method, you can access our detailed X-ChIP, dual-X-ChIP, or N-ChIP protocols.2.3 Chromatin preparation from tissuesExamining epigenetic mechanisms in specific tissues can reveal essential elements of tissue-specific genetic programming, development, and biological processes. ChIP can be a valuable tool for examining the roles and mechanisms of tissue-specific transcription factors, gene activation, and other aspects of epigenetic regulation.
Extracting chromatin from tissues can be trickier than using a cell suspension. Depending on the type of tissue you are using, you’ll need to optimize the chromatin preparation step of the protocol. For protocol optimization, you need to consider that the exact amount of tissue you need depends upon protein abundance, antibody affinity, and the efficiency of cross-linking. The following protocol was optimized using 5–15 µg of chromatin for each ChIP assay, with 30 mg of liver tissue for each ChIP/antibody. Exact chromatin concentration should be determined for each tissue type before starting the X-ChIP assay.
Download our protocol for chromatin preparation from tissue samples to get you started.2.4 Chromatin preparation from plant samplesIn contrast to animal cells, plant cells have a rigid cell wall that poses limitations to the protocols established for animals. In this protocol, we show you how to prepare chromatin from the plant model Arabidopsis thaliana. Once you have a good chromatin sample from your plants, you can use the standard X-ChIP protocol described above.
Download the full protocol here.
SummaryYou should now have a better idea of the different ChIP protocols and chromatin extraction methods you will need for your ChIP experiments. Here’s a quick rundown:
• Use X-ChIP to analyze proteins weakly bound to DNA
• Use N-ChIP to analyze native histone modifications
• Optimize your chromatin extraction steps when working with tissues
• Chromatin extraction from plant cells will require additional steps due to their rigid cell walls
In Part 3, we’ll introduce you to ChIP data analysis, including quality checks, mapping, and producing heat maps and gene ontology terms.
Start Part 3 now!