
-
Antibody basics training
Part 3: testing, controlling, and optimizing
Welcome to our training series on how to choose and use antibodies. Here we’ll guide you through topics such as selecting the right antibodies for your needs, handling and storing antibodies, antibody validation, and troubleshooting when things go wrong.Now that you know which antibody you need for your application, and how to properly aliquot and store it, you need to think about how to validate that antibody. In part 3 of this series, you’ll learn how to validate your antibody, choose the right controls, and optimize your experiments to get the best possible results.
Part 3 overview3.1 Validating your antibody
3.2 Choosing your controls
3.3 Optimizing your experiments
3.4 Step-by-step protocols
3.1 Validating your antibodyAntibodies are intrinsically variable reagents, and you must take the time to ensure that each antibody performs as expected in your experimental setup. A good supplier tests their antibodies, but it’s impossible to account for the huge number of different protocols and reagents with which researchers may use the antibodies. Your validation steps are, therefore, essential because they’re specific to your setup.
Below are just a few of the most commonly used methods for validation.
Validation Benefits Limitations Knockout (KO) models
Protein-encoding gene eliminated with genetic tools (eg CRISPR)KO cell lines function as a true negative control
Guaranteed null expression of the target genePre-made and validated KO cell lines and lysates are readily available from suppliers, including Abcam
Knockout cell lines may be used in all assays - western blot, immunohistochemistry (IHC), immunocytochemistry (ICC), flow cytometryKO cell lines against specific genes are not always viable
It offers a very powerful negative control but does not give confirmation of target bindingWestern blot
Protein detected and quantified in a sample, based upon initial protein separation by size and then blotting onto a membrane for antibody detection and analysisUseful for determining antibody specificity against the target protein, based upon the molecular weight
Ideal for detecting either native or denatured proteins
Semi-quantitive assay
Can run cell fractions to evaluate protein levels in various cellular compartmentsTime-consuming
Difficult to determine the optimal experimental conditions (ie methodology and buffer)
Only a small number of antibodies can be validated per runIHC and ICC
Protein in tissues (IHC) or cells (ICC) detected via specific antibodies and reporter moleculesValidates whether an antibody recognizes the correct protein according to its cellular localization
Specificity confirmed using cells that either do or do not express the target protein
Qualitative assayUnable to determine if an antibody cross-reacts with other proteins at the same sub-cellular location
Often difficult to determine cell or tissue types that either do or do not target the protein
Get the full guide to antibody validation including IP-MS, cell treatment, and more
Knockout validation of antibodies
A good antibody exhibits target specificity and sensitivity, allowing it to identify the protein of interest even at low expression levels. However, an increasing number of studies have shown that not all antibodies are specific in this way, with many dysplaying cross-reactivities with off-target proteins. This has led to the recognized issue of experimental irreproducibility.
KO validation is one of the most accepted and trusted validation processes for antibody specificity. This robust technique can confirm the specificity of the antibody by testing it in a KO cell line, cell lysate, or tissue that does not express the target protein. A specific antibody should, therefore, produce no signal in the KO cell line but give a specific signal in the wild type cell line. In this way, KO validation serves as a true negative control.
We recommend you choose antibodies that have been validated in multiple applications, ideally with the use of KO technologies. Alternatively, you can validate an antibody yourself, using the appropriate KO cell line, KO cell lysate or tissue.
Learn about the value of gene-knockout technologies in large-scale antibody screening by watching the video below.
3.2 Choosing your controlsExactly which controls you need for your experiment will depend on the assay you have planned. However, whichever experiments you run, you should always include positive and negative controls wherever possible. We understand that performing all the necessary controls can seem tedious, but it is the only way to validate your results and ensure the viability of your data. So, get in the habit of using proper controls right from the start.
Tissue and cell controls
Locating the relevant cell lines or tissues to use as controls can be difficult and may mean searching the literature. But before you either order your KO cell lines or trawl through publications, here are some databases that have useful expression data and serve as a great starting point:
• Genecards
• Uniprot
• Entrez Gene
Watch the below video on how to search these databases.
Application-specific controls
Recommended controls for western blot should include:
• Positive control lysate: a lysate from a cell line or tissue sample known to express the protein you are detecting. It will verify that any negative results are valid.
• Negative control lysate: a lysate from a cell line or tissue sample known not to express the protein you are detecting. This is to check for non-specific binding of your antibody and false-positive results.
• Loading controls: antibodies to housekeeping proteins or proteins that are expressed at equivalent levels in almost all tissues and cells. These controls should be used to check that all samples are loaded equally and to measure the amount of protein present in samples
• Endogenous control lysate (if you are analyzing recombinant protein samples): folding of the recombinant protein may be different from the endogenous native form and may prevent access of the antibody to the epitope. Always ensure the recombinant protein includes the immunogen sequence for the antibody you are using. An endogenous positive control is important to validate the results, as well as to indicate how well the reagents (eg antibodies) and protocol are working.
• No primary antibody control: only secondary antibody is added. This can indicate the occurrence of non-specific binding of the secondary antibody.
Please see below an example showing the use of negative and loading controls in western blotting (Figure 1).
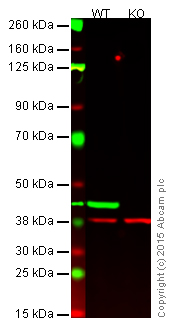
Figure 1. Western blot with anti-beta actin antibody [AC-15] (ab6276).
Lane 1: Wild-type HAP1 cell lysate (20 µg).
Lane 2: Beta actin knockout HAP1 cell lysate (20 µg), used as negative control.
Lanes 1 and 2: Merged signal (red and green). Green - beta actin (ab6276) observed at 42 kDa. Red - loading control (ab181602) observed at 37 kDa. Ab6276 was shown to specifically react with beta actin in wild-type HAP1 cells (lane 1). No band was observed in the negative control (beta actin knockout cell lysate in lane 2).
Controls for IHC
It is essential to run controls in IHC staining experiments to confirm that the observed staining pattern is true, accurate, and reliable. You should include antigen (tissues) and reagent controls.
Antigen (tissue) controls
• Positive control: a section from a tissue known to express the protein of interest. This will verify that any negative results are valid.
• Negative control: a section from a tissue known not to express the target antigen. This is to check for non-specific antibody signal and false-positive results.
• Endogenous tissue background control: a section from the tissue before applying the primary antibody. The tissue should be checked under the microscope using either fluorescent or bright-field illumination (for fluorescent or chromogenic labels, respectively) to ensure that there is no endogenous background.
Please see the below example showing the use of a knockout sample as a negative control for staining (Figure 2). You can see that the Ki67 knockout HAP1 cells (bottom) show no expression of Ki67 (green).

Figure 2. ICC/immunofluorescence image of knockout testing for Ki67 antibody in wildtype (top) and Ki67 knockout HAP1 cells (bottom). Green is anti-Ki67 [EPR3610] (ab92742) with goat-anti rabbit IgG (Alexa Fluor® 488) (ab150081), red is anti-alpha-tubulin [DM1A] (Alexa Fluor® 594) (ab195889), and blue is nuclear DNA labeled with DAPI.
Reagent controls
• No primary antibody control: tissue is incubated with the antibody diluent alone (without primary antibody), followed by incubation with secondary antibodies and detection reagents. This ensures that staining is produced from the detection of the antigen by the primary antibody and not by the detection system or the specimen.
• Isotype control: tissue is incubated with the antibody diluent and a non-immune antibody of the same isotype at the same concentration as the primary antibody, followed by incubation with secondary antibodies and detection reagents. This control checks that the observed staining is not caused by non-specific interactions of the antibody with the tissue.
• Absorption control: tissue is incubated with pre-absorbed antibody instead of the primary antibody, followed by incubation with secondary antibodies and detection reagents. As this control is performed to demonstrate that the antibody binds specifically to the antigen of interest, little or no staining is expected.
Controls for flow cytometry
Improve your flow cytometry results by using the appropriate controls for:
• Cell viability. Dead cells can produce artifacts due to non-specific binding and increasing autofluorescence levels, potentially leading to erroneous conclusions.
• Autofluorescence. Naturally occurring cell components such as NADPH and flavins can emit fluorescence that may mask antigen-specific signal.
• Spectral overlap. Fluorescence emitted from one fluorophore can be detected on a different channel. This phenomenon can seriously affect measurements on a given channel.
• Undesirable antibody binding. This occurs when the antibody binds to either an off-target epitope or an Fc-receptor (but not as a receptor-ligand interaction) or binds to an epitope or antigen through its conjugated fluorophore.
Get the full overview of recommended controls for flow cytometry.
3.3 Optimizing your experimentsApplication, check.
Antibody, check.
Validation, check.
Controls, check.Everything’s in place. The last step now is to optimize your antibody-based assay to reduce any non-specific background signal. Things to consider here include incubation times, blocking conditions, choice of a buffer, and antibody dilution.
Antibody dilutionYour antibody should come with an optimal dilution on the datasheet, but this might not be optimal for your setup. For this reason, you should establish which concentration gives the best signal. The most practical way to do this is by using a series of dilutions in a titration experiment. For example, if a product datasheet recommends using a 1:200 dilution, then we suggest making dilutions of 1:50, 1:100, 1:200, 1:400, and 1:500.
A titration experiment involves first selecting a fixed incubation time and then a series of experimental dilutions of the antibody. Each dilution should be tested on the same sample type to maintain all experimental conditions as the same.
If you have an unpurified antibody and don’t know a suitable dilution to start with, you can use the table below to get going.Tissue culture SN Ascites Whole antiserum Purified antibody Western blot or dot blot 1/100 1/1000 1/500 1 µg/mL IHC/ICC Neat-1/10 1/100 1/50-1/100 5 µg/mL EIA/ELISA 1/1000 1/10000 1/500 0.1 µg/mL FACS/Flow cytometry 1/100 1/1000 1/500 1 µg/mL IP N/A 1/100 1/50-1/100 1-10 µg/mL Conc. estimate 1-3 mg/mL 5-10 mg/mL 1-10 mg/mL N/A
Conc.=concentration, EIA=enzyme immunoassays, IP=immunoprecipitation, SN=supernatant
It’s worth taking the time to optimize how long you incubate your antibody for, how you decide to block (BSA, casein, serum, commercial blocking reagents, etc), and the types of buffers you’re using. These steps will help you to generate accurate data.
A little time invested at the beginning could potentially save you weeks further down the line.
3.4 Step-by-step protocolsThese protocols provide you with the steps to follow for sample preparation, antibody incubation, and data visualization. For best results, we have also provided optimized protocols, including recommended dilutions on the datasheet of our antibodies.
Get your protocol guides below:
• Western blot
• Immunohistochemistry
• Immunocytochemistry and immunofluorescence
• Flow cytometry
SummaryAnd that's the end of Part 3. You should now be better equipped to:
• Validate your antibodies
• Choose the appropriate controls
• Optimize your experiments
• Apply protocols for western blot, ICC/IF, IHC, and flow cytometry
In Part 4, the concluding part of our series, we’ll give you answers to the common problems encountered in immunoassays like western blot, IHC, and flow cytometry. This will include the following problems: no/weak signal, high background, and incorrect staining. We’ll also give you several detailed troubleshooting guides to other applications to help keep your research on track.